


What Is This Project About?
This project is an automated system for sending email notifications about Zotero updates [done by other users]. It uses a PHP script hosted on 000webhost and a GitHub Actions workflow for scheduling.
Table of Contents
- What Is This Project About?
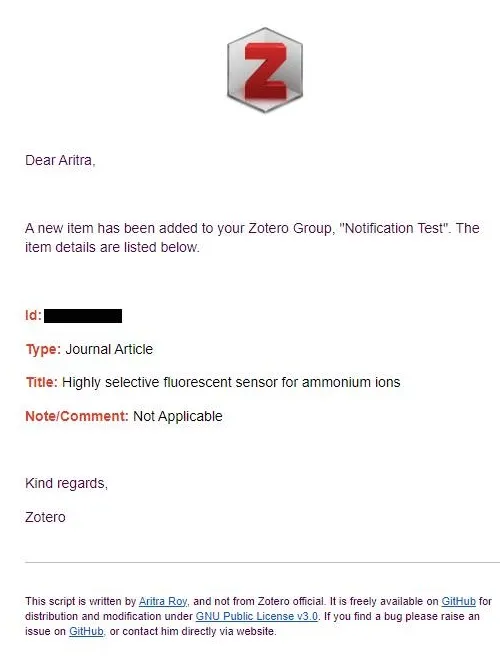
- Screenshot of the Email Notification
- What Is Zotero?
- Requirements
- How to Host the PHP Script on 000webhost
- Setting up Authentication & Automation
- License
- Contributing
- Issues
- Maybe A Star?
- Contact
What Is Zotero?
Zotero is a free, open-source reference management software that helps you collect, organize, cite, and share research. It’s easy to use, connects with your web browser to download sources, and helps you create bibliographies in multiple formats. Whether you’re a student, researcher, or scientist, Zotero simplifies the task of managing and organizing research materials.
Requirements
PHP 7.3 and newer
How to Host the PHP Script on 000webhost
Preparing the Required Zip File
Navigate to the repository.
Click on the “Fork” button at the top right corner to create a copy of the repository in your GitHub account.
Once the repository is forked, you can download it as a zip file or clone it:
Download as ZIP
- On the main page of the forked repository in your account, click on the “Code” button and then “Download ZIP” to download the repository as a zip file.
- Extract the zip file in a new folder.
Clone the Repository
On the main page of the forked repository in your account, click on the “Code” button.
Copy the URL under “Clone with HTTPS”.
Open your terminal, navigate to the directory where you want to clone the repository, and run the following command:
Terminal window git clone <copied-url>
Navigate to the directory of the cloned repository in your terminal and run
composer install.
cd zotero-notification # or whatever the name of the extracted folder iscomposer install- If you don’t have composer installed, you can download it from here.
- It should create a new folder named vendor with all the dependencies installed.
- After the installation is complete, modify the email template with your name on line number 164 of the file
email_template.twig. - Finally, create a new zip file with all the contents of the new folder (zotero-notification-main.zip).
Creating Account on 000webhost & Uploading the Zip File
- Sign up for a free account on 000webhost.
- In the 000webhost dashboard area, click “Create a new website” and set your website (your-zotero-website.000webhostapp.com) name and password.
- For later reference, the username for your website will be your-zotero-website and password will be the same which you set in the previous step.
- Select the Upload site option to upload your new zip file in the
public_htmlfolder.
Unzipping the Zipped File
Download the
.editorconfigandunzipper.phpfiles from github.com/ndeet/unzipper.Upload the
.editorconfigandunzipper.phpfiles to thepublic_htmlfolder.Navigate to
your-website.000webhostapp.com/unzipper.phpin your web browser.Select the zip file you uploaded and click “Unzip Archive”.
After the files have been unzipped, delete the
.editorconfig,unzipper.phpand thezotero-notification-main.zipfiles from yourpublic_htmlfolder.Navigate to the
zotero-notification-mainfolder inside yourpublic_htmlfolder and move all the files from this folder to thepublic_htmlfolder.Delete the
zotero-notification-mainfolder.
For more visualized information, refer to this 000webhost forum thread.
Setting up Authentication & Automation
Creating the .env file
- In the
public_htmlfolder of your 000webhost site, create a new file named.env. - Open the
.envfile and set your environment variables in the formatVARIABLE_NAME=value. For example:
ZOTERO_API="your_zotero_api_key"ZOTERO_USERID="your_zotero_user_id"SENDGRID_API_KEY="your_sendgrid_api_key"FROM_EMAIL="your_email_address"TO_EMAIL="the_email_address_to_send_notifications_to"- Change the
FROM_EMAILandTO_EMAILvalues to the email addresses you want to send the notifications from and to, respectively.
Getting the Zotero API Key & User ID
- When logged in to your Zotero account, navigate to the “Settings” section in the topbar menu, and then “Feeds/API” to create a new API key.
- You can find your
userIDin this section itself. Copy theuserIDand paste it into your.envfile as the value forZOTERO_USERID. - Click “Create new private key” (API key), give description and set the permissions and save the key. Finally, copy it into your
.envfile as the value forZOTERO_API_KEY.
Getting the SendGrid API Key
Sign up for a free account on SendGrid.
After logging in, navigate to the “Sender Authentication” section in the left-hand menu, and then “Verify a Single Sender” to create a new sender using your email address from which you want to send the notifications.
After verification, navigate to the “Email API” section in the left-hand menu.
Click on “Integration Guide”.
Choose “Web API” as your email send method and click on “Next” to choose PHP as your preferred language”.
Give your API key a name, and click on “Create Key”.
Copy the API key and paste it into your
.envfile as the value forSENDGRID_API_KEY.
Remember to keep your API key secure and do not share it with anyone.
Setting up GitHub Actions
In your GitHub repository, navigate to the “Actions” tab.
Click on “New workflow”.
Click on “set up a workflow yourself”.
Paste the following YAML script into the editor:
name: Scheduled Workflowon: schedule: - cron: "0 */3 * * *" # runs every 3 hoursjobs: build: runs-on: ubuntu-latest steps: - name: Run a one-line script run: curl https://zotero-notify.000webhostapp.com/index.phpClick on “Commit changes”.
Enter a commit message, choose to commit directly to the
mainbranch and hit “Commit changes” again.
Limitations
- The free plan of Zotero offers 300 MB of storage and if you are out of storage, you will not be able to sync your library, and eventually, the script will not be able to fetch the latest updates.
- So, if you have more than 300 MB of stored data, you will have to upgrade to a paid plan.
- If you don’t want to upgrade, a way to get around this is to simply remove annotated PDFs after reading and and linking a hosted version of the file from google drive or dropbox.
- Google can mark the email as spam. So, you may have to check your spam folder for the notifications and set the email address as “not spam” to receive the notifications in your inbox.
License
This project is licensed under the GPL v3 License. See the LICENSE file for details.
Contributing
Contributions are welcome! Please feel free to submit a Pull Request. For more details about how to contribute, please refer to the CONTRIBUTING.md file.
Pull Request Process
- Fork the repository and create your branch from
main. - If you’ve added code that should be tested, add tests.
- Ensure the test suite passes.
- Make sure your code lints.
- Issue that pull request!
Issues
If you find a bug or have a question about the specific behavior of this project, please file an issue in the Issues section.
Maybe A Star?
If you find this project useful, please consider giving it a star on GitHub. This helps others discover it and motivates the maintainers.
Contact

If you have any questions or doubts, feel free to reach out at aritraroy.live or sending an email to contact@aritraroy.live